The hip flick and associated follow through are so vitally important to good rolling that they must be taught and mastered thoroughly at an early stage. Superficial ability is not enough as the stress of concentrating on body position or paddle movement later in the learning process may cause the pupil to forget to carry out the hip flick actions. As a result, he lifts his head out of the water first, loses power and the roll fails
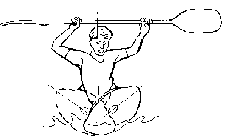 The first exercise is to sit in the kayak and feel that it is held firmly by pushing forwards with the feet on the footrest, upwards and inward with the knees and thighs against suitable fittings, downwards with the backside into the seat and perhaps backwards against the backstrap. Many beginners find it hard to remain locked into even a well fitting boat, so it is important that the equipment is adjusted as well as possible. The paddle is then held horizontally above the head and the boat rocked from side to side by lifting the knee and hip, first on one side and then the other; the body remains vertical throughout
The angle of tip and the speed of movement can be progressively increased until the boat is being tilted as far in each direction as the movement of the waist joint allows. This is a good practice for the “C to C” roll in which the shoulders and upper body remain square to kayak.
Rotation of the upper body can be added to the exercise in preparation for the fully-articulated screw roll. The paddle is held out in front of the paddler, and as the left knee and hip are raised, the torso is rotated to the left, and the right arm extended across the centre line to a position outside the left knee. At the same time the body curves forward at the waist and spine. As the kayak is rocked in the opposite direction the body unwinds, passes throughout the upright forward facing position, then winds up in the opposite direction, finishing with the left arm extended over the right side of the kayak, and the body bent over to the left. This exercise begins to give the paddler a sense of the timing and sequence of movements in the screw roll.
In the next exercise, the purpose is for the paddler to find the best recovery position. For a right-handed paddler, the recovery will normally be on the right side of the kayak.
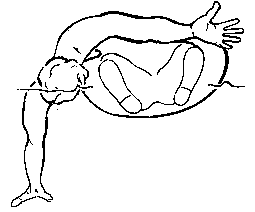 The aim is to immerse as much of the torso as possible in the water while moving it the shortest distance from the centre line. The angle of roll of the kayak is controlled with the knees and thighs to maximize the righting buoyancy force. To reach this position, begin by lowering the right arm deep in the water. Bend forward at the waist and rotate to the right. The left side of the face should brush over the spray deck and finish against the side of the kayak adjacent to the right knee. At the same time the right hand reaches deep into the water pulling the shoulder and upper body under the surface. The hand may help with support by sculling.
Most paddlers will find that, with a little experimentation, they can get their face in the water. Those who are more advanced and flexible will be able to progress to whole head and second arm immersion. Ultimately, this exercise can be developed into a complete hand roll.
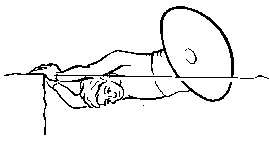 In this next exercise the body lies face-down in a horizontal position with the hands holding palm-down on to the side of the pool, the bow of the instructor’s boat, or any other reasonably firm support at water level. To reach this position a right-handed paddler must first rotate at the waist fully to the right, then hold the support and capsize to the right. It is important for the learner to realise that the face and body must be in the water for the exercise to be effective; again the range of movement should be built up until the paddler is stretching the waist in each direction as far as possible, pulling the kayak over with the left knee, then rolling it by pulling the right knee through under the kayak. Initially this should be repeated several times with the body lying passively at the surface- no attempt should be made to bring the body out of the water until the hip flick can be performed almost without thinking.
There is a tendency for the bow of the kayak to drift out from the side of the pool forcing a rear deck recovery. It is important that the paddler keeps the bow close to the side of the pool so that a recovery with the face close to the knee can be practised. Pushing out with the rear hand and pulling in with the front hand will help with this. Once the hip flick can be done consistently with both hands providing support, it should be practised again using only the control hand, since only one hand provides support during the paddle rolls.
The Body Follow Through
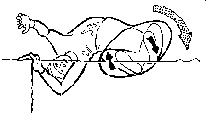 The next stage in developing the complete action is to add to the hip flick (just described) the recovery from the water: as the boat passes through the on-edge position the spine starts to bend forwards from the base; this keeps the head and shoulders in the water, generating buoyancy, until as late as possible in the recovery; the shoulders and face leave the water last, with the face close to the middle of the thigh. This exercise, too, should be repeated a number of times. The diagram shows a recovery in the “C to C” position. Ideally, the paddler’s face should be closer to the side of the kayak as it comes out of the water. In order for this to happen, the paddler needs to be bent forward at the waist in a more face-down position than shown here.
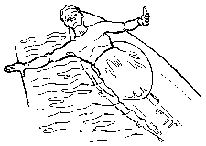 If the pupil has difficulty in achieving this flexibility of the spine, then alternative methods of lifting the body from the water can be tried. Many kayak rollers finish by lying along the back deck with no rotation at the waist; this causes less strain to the beginner, but is less effective for two reasons. First, the body clears the water and the torso buoyancy force is lost much earlier in the movement; second, the laid back position is a very poor one for resuming paddling on rough water since the paddler is disoriented, looking up at the sky, and is in a weak position to brace with the paddle. If the roll fails when he is in this position then his face is very exposed to rocks and other obstacles. From this position, he has to pull himself upright with the stomach muscles, expending valuable time and energy, before he can do anything else.
If this is the only method learned for kayak rolling, then in some boats with high rear decks the body is prevented from leaning very far back, and so finishing the roll is difficult. When paddlers have learned to roll in a pool, they often find that wearing a buoyancy aid in the laid back position pushes the centre of gravity significantly further out from from the boat, and this effect often contributes to difficulties in converting a pool roll into a river roll. One possible way round this for the stiff-waisted paddler is to lean forward. Particularly in large-cockpit boats the face lies close to the front of the spray cover, and the centre of gravity can be brought very close to the axis of rotation. If the boat has a small cockpit, then the head ends up on the raised part of the foredeck and again the centre of gravity is forced further out. The forward position is better than the laid back position because the paddler’s face is much better protected and he can sit up into a strong paddling position quickly after rolling.
Using The Paddle – The Teaching Rolls
Only when the pupil has a reasonable proficiency in the hip flick and body follow through is it wise to introduce the use of the paddle. Most beginners want to start with the paddle immediately, but its use too soon can lead to the development of bad habits, such as the flick-free or stiff roll, or simply to a discouraging lack of success. Most beginners find it easiest to start by learning either the ‘Pawlata’ or the ‘Put Across’ rolls.The former is the most commonly taught (in England), and seems to work very well for the confident paddler; the latter has the benefit of being simpler and of encouraging a better hip flick. Teachers of rolling should experiment with both methods so that they can use whichever suits their pupil best.
The Pawlata Roll
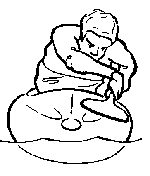 The Pawlata is a good roll to learn initially. It is directly related to the Screw roll which is probably the most useful roll of all, but it is a little easier to perform and more forgiving of failures in hip flick or follow through technique. The aim of teacher and pupil should be to progress to the Screw roll as soon as possible after the Pawlata has been learned. The paddler sits upright in the boat, with his back curved slightly forward and his body twisted towards the side on which he wants to capsize. A right-hand-control paddler will normally capsize to the left and vice versa. The control hand is then the forward hand and this holds the centre of the shaft. In rolling, as in other strokes, it is important that the hand maintains its normal orientation to the blade, and is not allowed to slip around the shaft. The control of the blade angle during the roll must be carried out by this hand. This may feel strange – if the hand moves past the center of the paddle shaft the ovalling of the shaft is opposite to normal.
The rear hand holds the centre of the tip of the rear blade as shown, thumb pointing down across the face, and fingers wrapped around the tip. To start the wind-up the control hand rotates the front blade outward through an angle of about 30 degrees.
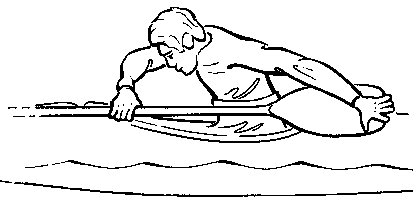
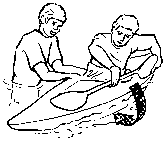 In this position it lines up with the angle of the front of the deck. The instructor should then stand in the water next to his pupil on the opposite side to the paddle. He supports the boat to allow the pupil to complete the wind-up. In the fully-wound position the pupil is twisted at the waist towards the paddle and bent forward over the side of the boat, with the chin near the middle of the thigh. The paddle is parallel to its initial position with the front blade still held at the same angle, but it is now under water.
The arms are locked tightly against the side of the boat to make sure that the paddle is not carried out of position by the water flow past it during capsize. The paddler should feel the edge of the kayak on the inside of the left elbow and right wrist. The instructor tells the paddler to hold the position when he has capsized, wait until the boat settles, and then sweep the paddle in a wide arc along the surface.
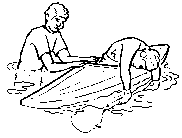 The instructor should support the pupil so that he can achieve a good tight wind-up with the paddle locked in to the side of the boat. It is often helpful for the instructor to counterbalance the kayak while it is in the upright position so that the pupil can practice without fear of capsizing. The pupil can then be lowered into the water when he is ready; the instructor reaches under the boat to help hold the paddle in place as it travels through the water, under the boat and back to the surface. He should then move to the bow of the boat, where he is then in a good position to counter one of the most common mistakes, which is for the paddler to pull down instead of sweeping out along the surface. This commonly happens because the back hand is not pushed sufficiently far underneath the pupil’s seat during the wind-up, so it is blocked by the gunwhale as it tries to follow through with the body twist.
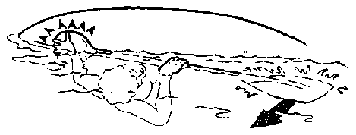
The paddle is not able to continue with its outward sweep, so pulls down instead. The paddler should aim to start the action with the back hand on the centreline underneath the boat. If the instructor is at the bow of the kayak, can reset the paddle position or blade angle, walk the paddle round in the correct path, he can give it a push in the right direction, or move in and support it to give the paddler something to pull up on. If necessary he can right the boat by placing a hand on each gunwhale and ducking underneath.
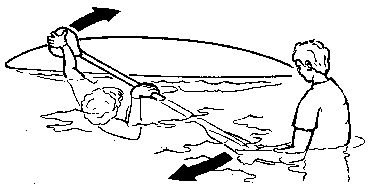 The hip flick action in the pawlata has an additional feature to that already practised – during the course of the roll the body must rotate from a face-up position to a face-down position.
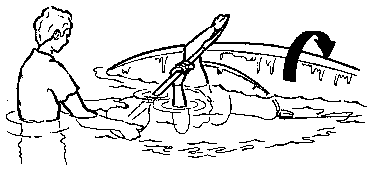 In doing so the waist and upper body twist in a similar way to the action of a conventional forward sweep stroke.
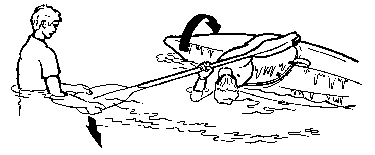 The waist and hips act as a universal joint converting the rotation of the body into a rolling action of the boat, incorporating the hip flick already learned.
It is this body rotation that also drives the paddle around in a wide sculling sweep along the surface. Some paddlers find that making a conscious effort to stretch as far out along the surface as possible is helpful. Others find a focus on keeping the face in the water as late as possible is a critical factor in success.
Once a good pawlata has been achieved and refined, the pupil should be encouraged to try the screw roll. Provided that the hip flick is effective and that the back hand is pushed clear of the hull to give space for the extended rear paddle, the progression can be effected with little difficulty.
In its own right, the pawlata should still be practised by all paddlers from time to time, as occasions can arise where the paddle must be used from an unusual position or extra power must be generated.
The Put Across Roll
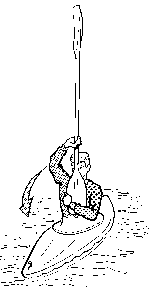 The second of the principal teaching rolls is the Put Across Roll. It seems to have fallen out of favour in recent years, but it has one major advantage over the Pawlata in that the hip flick action is almost identical to the initial drill. For pupils who have trouble putting all the components of the roll together, particularly those who lose the hip flick while trying to master the paddle action, it offers a valuable intermediate step. In particular, once the eskimo rescue technique has been learned, the put across offers a method of learning that can be used on open water with a high degree of success. In its own right, it is particularly useful if the paddle has been let go, as it can be performed very quickly after the blade has been regained. It is unusual in that the paddle is not carried down on one side during capsize and brought up on the other, but is left at the surface while the body does all the movement. One way of introducing the roll after the hip flick drills is via the ‘Queen’s Salute’ position. In this case capsize should be towards the control side. The top hand is the control hand and holds the paddle just above the lower blade, maintaining the correct register with respect to the upper blade. (This may cause a little confusion at first if the hand grips are ovalled since the hand feels the wrong oval). The lower hand holds the edge of the blade as shown, ready to apply upward pressure. The boat is capsized and the position held until the upper blade touches the water. (If the pupil attempts to cheat by lowering the paddle using the arms the blade cuts into the water end first and sinks). Once the blade is flat on the water the paddler pulls down with the control hand and rolls the boat upright, exactly as he did in early hip flick exercises. The other hand prevents the inner blade sinking. The action is much stronger if both elbows remain in the same vertical plane as the shaft and inner blade.
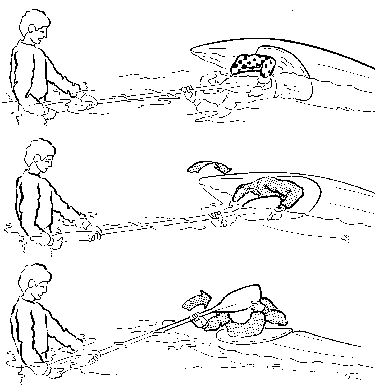 The roll may also be approached by floating the paddle on the water next to and perpendicular to the centre of the boat with the closer blade vertical. The blade hand can easily reach across the body to hold the paddle, and the other hand can move into position during capsize. Care should be taken to ensure that the paddle is not pushed under the surface as the pupil capsizes on to it. A common problem with this roll is pulling down with both hands, resulting in the near blade knifing very quickly towards the bottom and giving no support. It is corrected by emphasizing the upward pressure with the blade hand. (It is possible to roll from a near blade that is horizontal, using a downwards push with one or both hands, but this is really a variety of hand roll and is much harder).
Once the basic sequence has been mastered, the hands are moved into position later and later in the capsize, until the pupil can swim a few strokes to the blade, find the position, and then roll up. He can finally complete the roll by capsizing on one side and reaching for the paddle on the other. Many ‘real’ rolls use elements of the put across, often without the paddler being aware of it. It is, for example, quite common to see a screw roll finished with the downward pull of the put across – this can sometimes leave the paddler in a much stronger position than continuing the sweep to the rear of the boat. The classic “C to C” roll uses a sweeping action similar to the screw roll to move the paddle into position, then a vertical pull like the put across and a hip flick with very little rotation to bring the paddler upright.


